Milk chocolate Cookies recipe
 Is there anything better in the world than a chocolate malt? Notice I didn’t say chocolate shake, though goodness knows I wouldn’t turn one down if someone offered it to me.
I’m talking about chocolate malts—milkshakes with the addition of malted milk powder. When I was a little girl, I was obsessed with malts. Starting at a young age, I started making them for myself after school, just before I had to change into my leotard and tights for ballet. I continued this practice until I was approximately fifteen, when I replaced chocolate malts with carrot sticks and saltines.
But it was wonderful while it lasted.
Today I can still taste the difference between a chocolate malt and a chocolate shake. I can also taste the difference between regular chocolate chip cookies and those made with the addition of malted milk powder. Malt just has that extra something—that indescribable afternote that makes you close your eyes and wonder why we humans are lucky enough to get to experience such wonderful flavors in the food we eat. For this reason alone, I would absolutely hate to be a dog.
Here’s what you need: flour, baking soda, salt, unsalted butter, sugar, brown sugar, vanilla, malted milk powder, eggs, and milk chocolate chips.
I rarely use unsalted butter, but break it out for certain sweets whose salt content I really want to control.
Begin by creaming the butter.
Then add the two sugars…
Then beat it together until totally combined.
Try to avoid dipping your fingers into the yummy mixture. I failed at avoiding it, and was immediately filled with delicious self-condemnation, and I don’t want the same thing to happen to you.
Next, crack in the eggs and beat lightly…
Then add the vanilla and beat until just combined.
Don’t eat it yet! Good things come to those who wait.
Now it’s time to grab the malted milk powder. (And just in case you didn’t know, you can stir this stuff into a glass of milk and chug it down. Divine. And not non-caloric. Not at all, actually.)
Measure a rounded half cup—probably half a cup plus 2 tablespoons.
Dump it in…
…And mix it together gently.
Next, throw the flour, baking soda, and salt in a sifter.
Sift it all together so that it’s a big, fluffy pile.
Dump in half of the flour mixture, then mix together gently. Repeat with the other half. Don’t overmix; just beat slowly until it’s just combined.
Finally, dump in the chocolate chips. I like to use milk chocolate chips because they’re milder than semi-sweet (which the thin cookies seem to need more) and they also complement the malt flavor nicely.
Plus, milk chocolate is just dang good.
Mix until the chocolate chips are evenly distributed.
I’m a user of cookie scoops. Don’t know why. Just like ’em. And if you want all the cookies to be the same size, just make sure you level off the top of the dough when you scoop it.
Yay, uniformity!
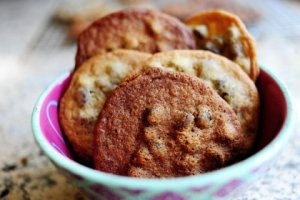
Now bake the cookies for 10 to 12 minutes. The less you bake them, the chewier they’ll be. The longer you bake them, the crispier they’ll be.
This was right at ten minutes; notice how soft they are in the middle. But I let the cookies remain on the hot cookie sheet for about five minutes after removing them from the oven; this way, they set a little more and they wind up just perfect.
And yes—the cookies are supposed to be very flat! That’s what’s so yummy about ’em.
Flat, baby!
I love flat cookies. Love them.
These were around 15 minutes. I took a walk on the wild side.
These cookies are delicious if you let them get brown. Delicious. They still wind up being delightfully chewy, but they have a nice dark sugar taste to them. Yum.
See the difference between 10 and 15 minutes?
I took the liberty of tearing off a piece, eating it, and fainting right there on my dirty tile floor.
It was an awesome experience!
Yum. Make half of them dark and half of them light, then serve them all in a nice big bunch. Variety is good!
And speaking of good…
Vanilla ice cream. But you just use any ol’ flavor you like.
Press lightly.
Then coat the sides in sprinkles…or nuts…or whatever you have on hand. Then wrap tightly in plastic wrap and place into the freezer for a good hour at least. This’ll make sure the ice cream is nice and firm.
The darker/more crispy cookies really work well for ice cream sandwiches! The crispiness keeps the cookies from getting soggy, and because the cookies are thin, they’re not as difficult to bite into as thicker cookies would be in a frozen state.
Just look—I’ll prove it.
Yep. No problem whatsoever!
I highly recommend the cookies. And I highly, highly recommend going one step further and making the ice cream sandwiches.
More
|
Walkers Shortbread Milk Chocolate, Orange Royals, 4.4-Ounce (Pack of 4) Grocery (Walkers Shortbread)
|


