Banana Bread recipe with almond milk
I firmly believe that banana bread is something you should be able to make anytime and anywhere, with a mixer or with a fork, in a loaf pan or in a muffin tin — whenever you have a few bananas going soft and freckly. Banana bread, I'm pretty sure, is at least 50% of the reason bananas exist.
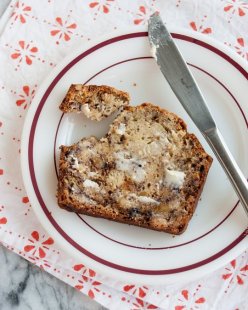
Here is a very basic and very forgiving recipe that takes all of 10 minutes to whisk together. An hour of waiting while your house fills with tempting aromas and then you'll be snacking on your very own slice of warm, fresh-baked banana bread.
Only Use the Ripest Bananas
Just about the only requirement for making banana bread is that you use ripe bananas. Once the skins start to develop freckles and the fruits are just a little too soft for pleasurable snacking, then it's banana bread time. Letting your bananas ripen even longer — until the skins are brown and the fruit falls apart when you peel it — will make your bread even more strongly banana-flavored and richer.
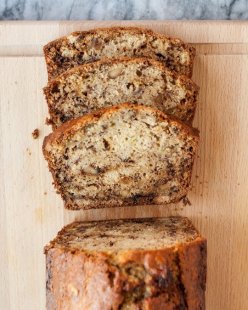
Let's also talk for a second about mashing. Personally, I like to leave some banana chunks in my bread and I also like the one-bowl simplicity of mashing the bananas directly into the batter. If you are anti-chunk and like your bananas to be completely smooth, I recommend mashing them into a pulp in a separate bowl and then mixing them into the batter.
A Very Forgiving Recipe
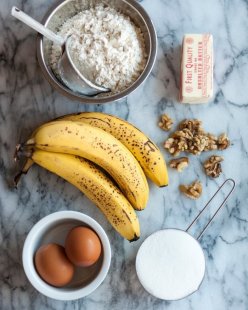
With a very few variations, the recipe I give below is universal to almost every church or community cookbook written in the last 50 years. It's definitely time-tested! It uses ingredients most commonly found in our pantries: white all-purpose flour, granulated sugar, butter, eggs, milk, and baking soda.
But when I say this is a forgiving recipe, I mean it. You can swap up to half the flour for whole wheat or another favorite whole-grain flour. You can use brown sugar instead of white (which makes a denser, moister bread) or another sugar altogether. You can use margarine or oil for the butter and almond milk, kefir, buttermilk, or even water for the liquid. The bread will be fine with just one egg. I've never tested it without eggs, but I suspect this would still make a perfectly snackable loaf.
 My point here is that you can still make banana bread even if you find yourself short on one of the other ingredients (except the baking soda — you need that!). You can also get creative and play with these base ingredients to your heart's content.
Using a Mixer vs. a Fork
If it weren't already clear by this point, the implied subtitle of this recipe is "don't fuss; make it easy." If you find it easier to make a recipe like this in a stand mixer or with a hand mixer, then that's the method you should use. Personally, I prefer to make it by hand in a bowl the way my mother taught me — that feels somehow easier to me even though the same number of bowls get dirtied.
If you use a mixer, you have two options: you can melt the butter as directed and follow the recipe exactly, or you can leave the butter softened and cream it with the sugar. Creaming the softened butter and sugar will make your banana bread lighter and more cake-like with a finer texture; melted butter makes the bread denser and less crumbly.
How do you make your banana bread? Is your recipe similar to this one? Do you follow a different technique? And the most important question: chocolate chips, nuts, or plain?
Once the skins start to develop freckles and the fruits are just a little too soft for pleasurable snacking, then it's banana bread time.
How To Make Banana Bread
Makes 1 loaf, easily multiplied
What You Need
 Ingredients
1/2 cup (1 stick) unsalted butter
1 cup granulated white sugar
2 large eggs
3 medium bananas, very ripe
1/4 cup milk
1 teaspoons vanilla
2 cups all-purpose flour
1 teaspoon baking soda
1/2 teaspoon kosher salt
1/2 cup chopped nuts or chocolate chips (optional)
Equipment
8x5-inch loaf pan
Parchment paper
Large bowl
Whisk or fork, if making by hand
Stand mixer or hand mixer, if not making by hand
Spatula
Instructions
- Heat the oven and prep the pan: Preheat the oven to 350°F with a oven rack in the bottom third of the oven. Line the loaf pan with parchment, letting the excess hang over the sides. Spray the inside with nonstick cooking spray. → If using nuts, toast them in the oven for 10 minutes as the oven is pre-heating.
- Melt the butter: Melt the butter in the microwave or over low heat on the stovetop. → Alternatively, for a more cake-like banana bread, soften the butter (but do not melt) and cream it with the sugar in a stand mixer in the next step.
- Combine the butter and sugar: Whisk together the melted butter and sugar in a mixing bowl until combined. (Or cream in a mixer until fluffy.)
- Add the eggs: Crack the eggs into the bowl. Whisk until completely combined and the mixture is smooth.
- Add the milk and vanilla: Whisk the milk and vanilla into the batter.
- Mash in the bananas: Peel the bananas and add them to the bowl. Using the end of the whisk or a dinner fork, mash them into the batter. Leave the bananas as chunky or as smooth as you prefer.
 If you prefer an entirely smooth banana bread, mash the bananas separately until no more lumps remain, and then whisk them into the batter.
 - Add the flour, baking soda, and salt: Measure the flour, baking soda, and salt into the bowl. Switch to using a spatula and gently stir until the ingredients are just barely combined and no more dry flour is visible.
- Fold in the nuts or chocolate, if using: Last but not least, scatter the nuts or chocolate over the batter and gently fold them in.
- Pour the batter into the pan: Pour the batter into the prepared loaf pan, using the spatula to scrape all the batter from the bowl. Smooth the top of the batter.
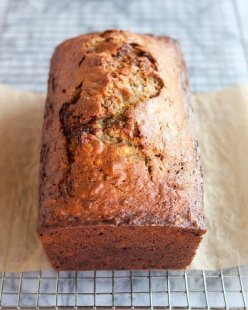
- Bake for 55 to 65 minutes: Place the pan in the oven. Bake until the top of the cake is caramelized dark brown with some yellow interior peeking through and a tooth pick or cake tester inserted into the middle comes out clean. Baking time will vary slightly depending on the moisture and sugar content of your bananas — start checking around 50 minutes and then every 5 minutes after.
- Cool in the pan for 10 minutes: Set the loaf, still in the pan, on a cooling rack. Let it cool for 10 minutes — this helps the loaf solidify and makes it easier to remove from the pan.
- Remove from pan and cool another 10 minutes: Lift the loaf out of the pan using the parchment paper "wings." Set it on the cooling rack to cool for another 10 minutes before slicing. Leftover bread can be kept, covered, at room temperature for several days or wrapped in foil and frozen for up to 3 months.
Recipe Notes:
• Banana Muffins: To make muffins, line a muffin tin with liners and fill each cup to roughly 3/4 full. Makes 8 to 10 muffins.
More
|
Alice Foods Thyroid Support Supplement with Iodine + "Thyroid Disorders" Guide - Premium Natural Ingredients - Improves Energy Levels and Metabolism - Pack of 60 Capsules - Perfect for Men and Women Health and Beauty (Alice Foods)
|


